Drone Won’t Calibrate? (Here’s What To Do)
TranscendFPV is a reader supported product and review site. Clicking on links to learn more, or buy products, may earn us money, and support our work. Learn more about the history of TranscendFPV and our passion on our About page.
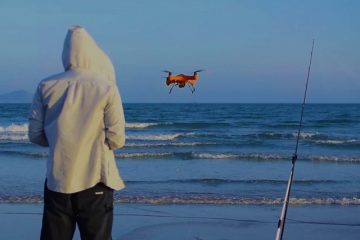
The excitement fills the air, you recently brought your new drone home, and you cannot wait to get it in the air. You have a ton of shots already playing out in your mind. You can see it flying across large open fields, through mountains and valleys, and following you on all your epic adventures. There’s only one problem. It won’t calibrate.
Most drone calibration checks fail due to an issue with the drone’s Inertial Measurement Unit (IMU) or compass. There are a few simple checks and procedures that you can perform to ensure that there is no manufacturing defect with your drone’s internal components.
Drones failing to calibrate is a known issue, and it is most likely not unique to you specifically. Many drone enthusiasts have encountered this issue in the past. Before you rush to enforce your drone’s warranty or demand a refund, consider the following.
Quick Links
Common Reasons Why Calibration Fails
- Calibration Surface. The surface you are using for the calibration tests is not entirely flat. Using an uneven surface while attempting to calibrate your drone will lead to either calibration failure or faulty calibration results and settings, requiring future recalibration.
- If your drone’s firmware is outdated, issues may arise during the calibration process because it does not have the latest updates installed that have solved previously known problems.
- Upon initial calibration, you need to ensure that your drone’s battery is fully charged. If the battery isn’t fully charged before initial calibration, the system might reject the calibration process and think the battery is faulty. The battery might be to blame if it is damaged. The drone might have built-in safety features keeping it from calibrating due to a battery failing an integrity check.
- If, at first, you don’t succeed, try and try again. If you are attempting to calibrate your drone multiple times in a row, either the drone or the app could malfunction if not allowed for enough time to pass in between calibration attempts.
- No app installation is guaranteed to be successful one hundred percent of the time. If you have ensured no physical fault in the system, then the responsibility might lie in the software.
- Faulty Components. Drones can be damaged during shipping, either directly to your door or the store. It is, therefore, possible that some of your drone’s internal components could have been damaged. Damaged parts often cause unforeseeable or unrecognizable errors during calibration.
Before You Begin The Calibration Process
Before starting the calibration process of your specific drone, you need to ensure the following:
- Ensure that you have enough space to calibrate your drone safely. If something goes wrong and your drone flies off in a random direction, you want to ensure there is no one around that might get hurt.
- Ensure that you remove all extra add-ons or accessories. The drone needs to be free from any accessories or additions that might affect the calibration process.
- Ensure that the surface you are placing your drone on for the calibration process is flat and not uneven, as this might cause the IMU’s calibration to fail prematurely or cause your drone to drift if the calibration is successful.
- Look out for a warning sign. The general rule is only to recalibrate your drone if prompted. Your drone does not generally need to be recalibrated mid-flight.
How To Calibrate Your Drone – Step By Step
Step 1: Place your drone on a smooth, flat, even surface.
Step 2: Power on your drone. You have to ensure that the drone’s battery is fully charged beforehand.
Step 3: Open your drone control app. If the app struggles to launch, consider uninstalling and reinstalling the app from a trusted app store.
Step 4: Enter the app’s general settings. This menu is usually identified with an icon containing three dots or a gear icon.
Step 5: Open the drone’s main controller settings.
Step 6: Find the option pertaining to your specific drone’s sensor settings and open it.
Step 7: Select the “Calibrate IMU” or “Calibrate Inertial Measurement Unit” option.
Step 8: Select start calibration.
Step 9: The drone will now start the calibration process. Be patient as this process might take several seconds to fully complete.
Step 10: Your drone will give you calibration instructions through flashing lights or app prompts. Follow the instructions and place your drone in the various positions demonstrated.
Step 11: Once you’ve followed all the position prompts, your app should deliver a “Calibration Complete” message.
Step 12: Turn your drone off and on again.
If the calibration process fails at any point during the calibration process, you can attempt to diagnose the problem yourself by using our list of common failures as a guide. If the calibration process continues to fail, consider contacting the store you purchased your drone from or contact the drone’s manufacturer directly.
Why Do Drones Have An IMU and Compass?
Modern drones have a built-in Inertial Measurement Unit and a compass. All these components work in tandem to give the drone accurate information regarding its surroundings.
The IMU and compass give your drone a sense of direction, and it utilizes magnetic fields to send data to your drone’s processing unit that gives it heading angles based on magnetic north.
Your drone utilizes its compass while flying to help it keep level and gives guidance to automated instructions. If there are external forces that cause changes in the magnetic field that your drone uses, your drone might start to fly off its intended heading and course.
Avoiding Compass Failure
Many external forces interact with the earth’s natural magnetic field, not enough to disrupt everyday life but enough to interrupt a drone’s function. Here are examples of everyday things to avoid to ensure that your drone’s compass functions as intended without mid-flight interruptions or disturbances that could lead to a crash.
- Electromagnetic Interference. The most common thing that generates high levels of electromagnetic interference is high voltage power lines. If possible, avoid flying near these constructs, not only because it can interfere with your drone’s compass, but hitting one of these high voltage power lines could cause massive damage to your drone and the local power grid.
- Operating or storing your drone in close proximity to strong magnets might cause issues with its compass. Magnets generate their own magnetic field. This field is known to cause drones to lose their sense of direction and often require recalibration.
My Drone Is Calibrated, But It Is Still Drifting

Suppose you have successfully calibrated your drone but find that it is still drifting; consider using trim controls. Trimming your controls can only be done mid-flight. If your drone is hovering to the left, push the trim button and release it to the right side. If your drone is drifting to the right, press the trim button and release it to the left side.
The same steps apply if your drone is drifting forward or backward. If your drone is drifting forward, push the trim button and release it to the backside, and if your drone is hovering towards the rear, press the trim button and release it to the front of the controller.
Fine-tuning your specific drone’s trim controls can be a slow and meticulous process. Take your time, and don’t overdo it.
You can find more helpful tips for fixing this in this guide.
We do not want our expensive, precious drones to crash before we get a chance to enjoy them.
Conclusion
Not all drone manufacturers have the same design, but this guide’s principles could point you in the right direction to resolving your issue. Just because the calibration process failed once doesn’t mean there is an inherent problem with your drone or its components.
After assessing all the individual components and steps, ensure that you didn’t miss anything before calling the store or contacting the company’s representatives to demand a refund or a repair.
Sending your drone in for diagnostics could be a costly endeavor if no fault is found. Some companies require you to send the drone back to the country in which it was manufactured. Sending your drone overseas could take many weeks, if not months, to arrive before the initial inspection can even begin.