How To Setup An FPV Ground Station: Ultimate Tutorial

TranscendFPV is a reader supported product and review site. Clicking on links to learn more, or buy products, may earn us money, and support our work. Learn more about the history of TranscendFPV and our passion on our About page.
FPV (first-person view) isn’t limited to only video games and movies anymore since the advancement of drone, wireless, and VR goggle technologies.
FPV came to the UAV industry, specifically commercial and hobby drones.
Flying a drone is fun in itself.
You get to fly it around, perform some aerial stunts, and capture footage while doing it. Now, flying an FPV drone is an otherworldly experience, available to anyone with enough skill to manoeuvre the drone.
FPV drone system is mainly recognizable due to the FPV racing, a rapidly growing sport of drone racing, commercialized by several racing leagues, and UAV associations. It refers to drones which are specially equipped with an additional camera for First Person View, instead of capturing video footage.
There are several commercial drone models meant for video capture that sport an additional FPV camera, as well as several hobbyist models. This additional camera is the window to the world of FPV, allowing you to access a remote “eye in the sky” onboard your drone.
What is FPV technology?
FPV cameras are small, light, reasonably priced video capturing devices which now exist due to development of security surveillance camera technology.
The FPV camera is mounted onto a drone to send a real-time video using a video transmitter.
It allows you to see where the drone is flying as if it had eyes. Depending on drone type and your setup, the FPV transmitter sends a live video signal to your remote-control screen, monitor, smartphone/tablet, or FPV goggles.
The live video signal uses radio frequency antenna, transmitter, and a receiver for delivering video signal. This live video transmission, coupled with a high-quality camera, allowed drones to be used in many positive ways, not just racing.
Video transmitters transmit the live video signal from your FPV camera to your goggles or ground station. They range in size and power, providing the pilots with the wireless technology that makes the whole FPV system possible.
Video transmitters are rated in terms of milliwatts (mW), which gives you the idea of how far a video transmitter can transmit.
The video receiver receives constant video transmission from the drone and converts the oscillating radio waves into electrical signals. FPV goggles or some other type of screen receives this analog video signal and converts it to an image displayed on the screen/goggles. Most goggles have an integrated video receiver into them, or at least the ability to fit one.
These goggles are an essential part of FPV flying, and they come in several distinct types. Box goggles and monitors tend to be the cheapest viewing option, but the low-profile goggles are the preferred viewing option by the community.
If your quadcopter has a decent antenna and a transmitter, the integrated FPV receiver in the goggles should be enough to fulfil most of your flying needs. However, if you feel like you need a better video reception, you can set up a ground station as a way to get a better response.
Quick Links
What is an FPV ground station?
An FPV ground station is a dedicated setup for receiving GREATLY ENHANCED Fpv video signals.
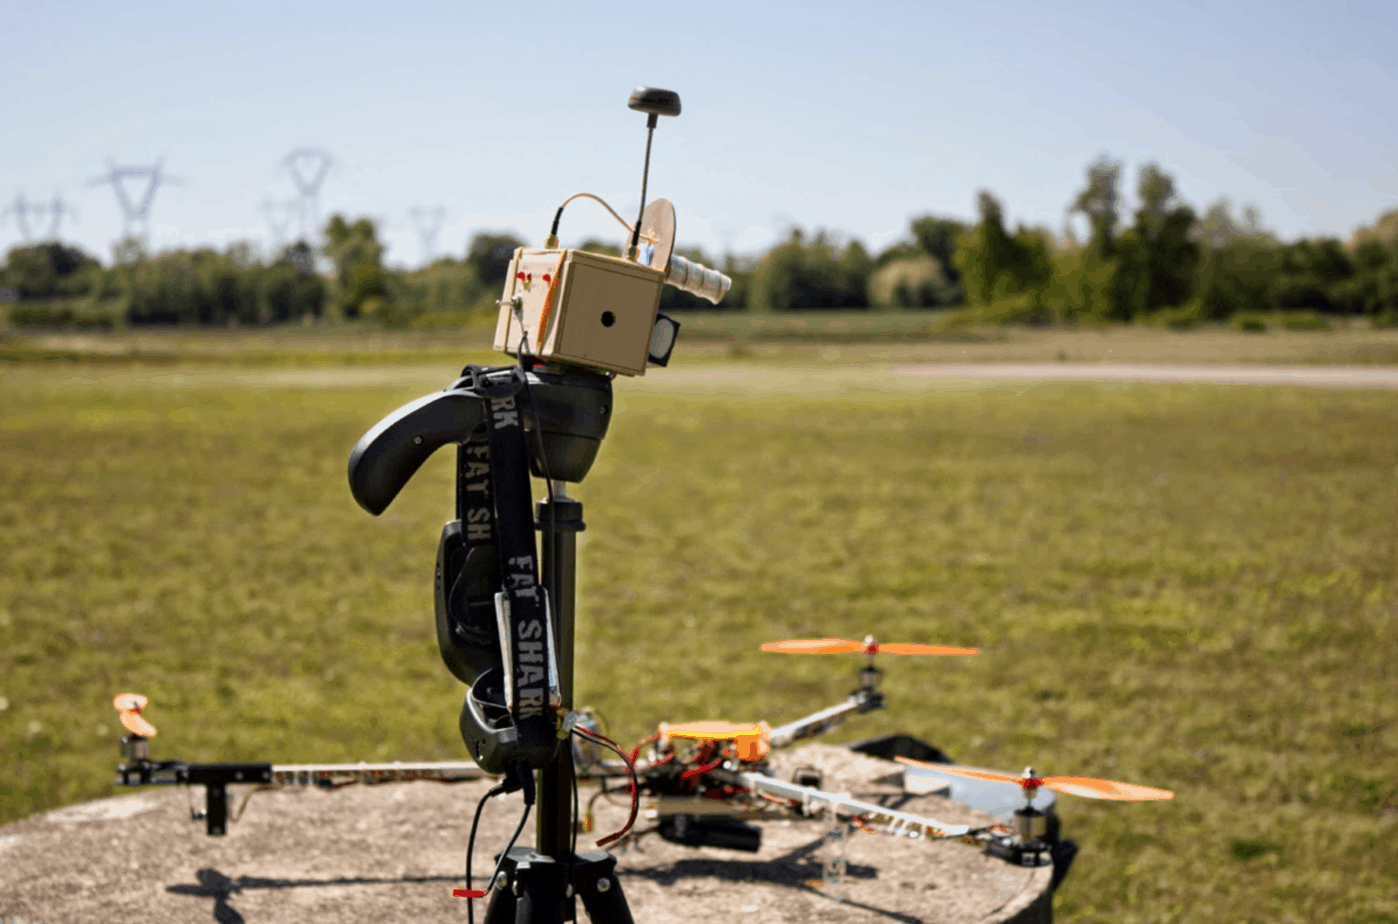
Basically, such configuration comprises a First-Person View receiver or a diversity receiver with its own power supply, mounted on a tripod to attain the optimum height required. A display may also be attached to the setup.
So, the FPV station is a receiving setup that communicates with your UAV, which isn’t directly attached to your goggles.
Setting up the FPV ground station
Before you start with the actual setup, there’s a thing or two you should know about receivers and antennas.
Setting up a ground station is a waste of money, if you aren’t going to use a diversity receiver, especially if you’re using the 5.8 frequency range.
What is diversity?
Diversity modules allow for optimal RF video reception, as they are using two receivers instead of one, each with their own antenna.
Based on the signal strength, a logic board will select the best video signal from the two receivers, and send a stronger signal to the goggles/screen. The switches between the receivers happen rapidly, and seamlessly, providing the pilot with the best signal without a glitch.
- Diversity systems usually have a single omnidirectional (circular polarized) antenna on one connector, and a directional antenna on the other one.
- Antennas are one of the most important, yet most overlooked parts of the FPV ground station setup. There are usually two types of antenna, best used in combination with each other and a diversity receiver.
- The helical and patch antennas are directional, receiving the signal in a cone shape, which extends in the direction the antenna is facing. They are meant for farther flights in a single direction.
However, flying sideways, or behind the helical antenna will result in a weak video signal reception.
For those kinds of flights?
An omnidirectional antenna is the best choice.
Keep in mind that these cover relatively shorter range than helical antennas, due to the evenly distributed radiation patterns.
Both antennas are combined with a diversity receiver to minimize the additional setup required when switching flight patterns. This way, you will always receive the best signal possible.
Basics of an FPV ground station
Setting up a ground station is pretty simple; however, it does depend on you build preference, and the number of features you want to add. So, there’s a list of things you might want to think about first:
Features – Consider all the features you want to build into the station, other than FPV. Telemetry is a good idea since it can include data about battery status, altitude, direction, GPS data, and much more. Of course, this is only achievable if you have the right sensors and compatible board of receiver setup.
- Newer modules and receivers support telemetry if you buy appropriate sensors for the data you wish to monitor.
Components – you want to think this one through. Make sure that you take into account all the elements you wish to put into the station. As the name implies, an FPV station must have an FPV monitor or goggles, and all the accompanying components as well as a power source.
- If you’re on a tight budget, leaving some components out, like telemetry module, can reduce costs. You can always buy it later, so leave some room for upgrades inside your case.
- All of your components must be compatible with each other. Also, make sure that they require a standard voltage of 11.1 – 12V. Ensure that all your antennas are the right polarity and that your remote frequency doesn’t match your FPV frequency.
Battery – All these components require power, so make sure that you have the corresponding battery powering them. Also, consider battery power capacity, or simply, how much energy is stored inside the battery. Longer flight time will require a longer-lasting battery.
Casing – Depending on your setup, and the components you wish to include, consider different types of housing. If you’re going with a minimal FPV configuration with required elements, a small plastic housing mounted on a tripod will do the trick.
- More robust setups, the ones including additional modules, several antennas, and an FPV monitor, require a more robust housing. Anything resembling a bigger case might do the trick.
- Keep in mind that all the components have to fit with all the adequate wiring. Also, leave some room for upgrading if you’re planning on adding features in the future. Look for a case that has elements you can work with and use to your advantage.
- All the components will heat over time, especially if they’re densely packed. A cooling fan or two will ensure the required airflow to keep your components at the desirable temperature.
Setting up an FPV station
All the things from the list above are equally important, so take time to consider them carefully. Don’t worry if this is your first time assembling an FPV station.
There’s plenty of room for further improvement unless you fry some of the components, in which case you’ll have to replace them.
Before starting your build, please connect everything to test it before fitting your components into the case. This way, you’ll know that everything works. If it doesn’t, you’re doing something wrong, or you may have a defective component.
Important – Do not turn on any of the transmitters or receivers without a supplied antenna connected. Doing this will almost instantly fry said components.
1: Make sure everything works
After you made sure everything works, it’s time to fit and secure everything inside the box. This step is pretty simple if you’re planning to use a basic setup. However, going high-tech by adding switches, LEDs, a fuse box, and other electronic elements does require some basic knowledge of electronics and soldering.
Mark everything out, every component, switch, LED, and check its dimensions and correct position, before you secure it in place. Take your time; you want your FPV station appropriately done.
Once you have everything figured out, and put in place, you can start preparations for wiring your components up to switches and other components.
If you want to use switches, test them out before soldering. You can avoid soldering, if you wish, by using spade connectors as they can be easily removed. This way, you can make removable wire connections between components, switch fuses, and LEDs.
If you wish to use this approach, make sure to check the polarity first. Also, fuses are a good idea since they protect your gear from damage by overcurrent or short-circuit.
2: Add a monitor
Adding a monitor to the ground station is also quite simple. You just split the video-out wire from the receiver, so one wire goes directly into the goggles, and the other goes into the monitor.
Having a monitor makes it easier for spectators to enjoy your flight, and it can serve as a backup in case something happens to your goggles. Just make sure your goggles take a video-in signal through the cable.
If not, you can feed the video-out signal from a low-frequency receiver into a 25mW 5.8GHz transmitter. By doing this, you can receive the video in your regular goggles that have a 5.8GHz receiver built-in. It’s not the best of solutions since it may cause signal interference between your drone and the ground station itself.
Important – Electricity can be dangerous, so be careful since you can damage your components or injure yourself. You should only do it yourself if you understand what you’re doing. If not, get some help from someone a bit more tech-savvy, like a friend or professional.
3: Test out the ground station
So, everything’s in its place.
The wiring is done, and all the switches, fuses, and the battery are connected. You’re done testing the components before fitting them into the case, and if the installation is done correctly, they should work now.
Remember – Make sure you connect the antennas before powering up any of your radio transmitters and receivers. Also, make sure their pairs are on the same channel. You might want to consult with the user manual to make sure you got this right.
After you confirmed everything works, it’s essential to label your connections and have a circuit diagram of how it all connects.
Once that is done, you can take your ground station out, set it up, and start flying. Just plug the video out from your receiver into your goggles and your monitor before you start.
You can use your ground station to fly using lower FPV frequencies like 2.4 or 1.3GHz.
In this case, swap out your 5.8GHz receiver for a receiver of your frequency. Just keep in mind: lower the frequency – bigger the antenna.
Conclusion
Building an FPV station isn’t as hard as it may sound, and it can be a fun project, especially if you’re a DIY enthusiast. It’s quite affordable, as well.
An FPV ground terminal is best used if your goggles have a limited number of receiver channels, or if you want to do long-range FPV flights. Done correctly, and with proper care, your FPV setup should serve you for years to come.


